Saturday, September 07, 2019

Bear With Me

You know those posts when people rave about something that’s been going on for a while as if it’s new because they’ve just discovered it? This may be that kind of a post for you, if you’re familiar with bullet journals.

If you aren’t, it’s basically an organizer. The system itself makes use of regular kinds of markings to indicate tasks, events, etc. But for me, there are two things that make bullet journals fundamentally different from the classic kinds of organizers I’ve bought at the Office Pr0n store* and then never actually used:
  • You buy a plain notebook in your desired size and figure out the layouts yourself, based on what it is that you want to keep track of. You can have a calendar, or task percent bars, a ledger to track spending, a calorie tracker, and so forth – whatever it is you want to track.
  • You decorate it: colored pencils, pens, paint, washi tape, with hand-lettering or stamps or patterning – there’s a zillion ways to go about it.
When I first heard about this, I have to admit, I was pretty dismissive of it. A quick Google of bullet journaling shows a large quantity of extremely beautiful, creative layouts that seemed to me to be so heavy on the inspirational quotations and trendy brush lettering that there wasn’t enough room for, you know, information, and it seemed to me that the point of it was to spend more time decorating the thing than actually using it. And there’s the trendy “#BuJo” hashtag. “Trendy” = uuuugh.

I think in hindsight that this was all probably a horrible attitude brought on by the inspirational quotes which, to a large part, make my skin crawl, perhaps due to overexposure in the workplace. ** And I’m probably definitely jealous of the artwork.***

But the bullet journal concept started because a person with autism (Ryder Carroll) needed to keep track of stuff (full story here), in a way that tied what he wanted to achieve with why he wanted to achieve it – that constant linking of what and why kept him stocked up with motivation. That story caught me: I think I’m probably on the spectrum, although I’ve never been diagnosed, and recently I’ve had ever more trouble trying to keep track of stuff, to the point of acute emotional distress. Plus, I am 100% ALL IN on the idea of the importance of why (see Simon Sinek’s “Start With Why”).

So what the heck, thinks I, I’ll try this out. I bought a notebook, came up with a rudimentary layout based on a really basic description of two-page layouts (so that the entire conceptual element – such as a week – is visible at once).

One-week spread
My layouts are laughably simple and amateur (as the photo attests), but I have to say, I am a convert. And I will tell you why. It is because my journal is my mental plot.

The Plot


In warfare, you need a plot. You need a map, or a chart, or something, where you can visualize all of the things you need to keep track of. Ideally, you mark up the plot with the things that require calculation (”is the enemy within range of my weapons? Am I within range of theirs? When will that radar contact be within visual range of my lookouts, so I can try to get someone to visually identify it?” “How close am I to someone else’s territory?”). Calculations and overlays are things that computers are good at producing on displays (and you can do it with pencils and some tools). So the trick is to let them do that, so that when you have one of those very important questions, you don’t have to waste time doing the calculation yourself. You just look and lo, there is your answer, on your plot.

Using a plot frees up your brain from these mundane, computer-friendly tasks, to do the things that the computers (or charts) can’t do: identifying patterns. Recognizing behavior. Using observation & intuition to tell a story that you use to make tactical decisions and to anticipate future needs & actions. Thinking about the “what-ifs”, especially “what if I’m wrong about this?”. If you are spending all of your time trying to do the math to figure out if you’re still positioned where you’re supposed to be, or within a weapon range, or whatever, you will forever be behind the problem, struggling to keep up. You’re going to miss stuff, and it’s probably going to be dangerous.

This has been exactly the problem that has been causing me so much distress. I have a lot to do – the work is complex and involved and I have to keep track of a zillion tasks, most of which cannot be completed without some kind of follow-up, which is yet another task. I’ve been trying to keep track of this mentally – no wonder I’ve been so extremely anxious about forgetting stuff. No wonder that, up to this point, feeling like I’m on top of my tasks list has filled me with the dread certainty that it’s only because I’ve forgotten something (and I almost always have). My brain is simply not wired to keep track of a large quantity of tasks like this, and I’ve been trying to force it to, and that has not been working out well for me. I’ve been missing stuff, and it’s definitely been painful.

My bullet journal is my plot. It is extremely good at holding lists of tasks. Moving that list out of my brain and into the journal frees up my brain to actually think about things and especially to be creative, which is something that the crushing need to track tasks – and the attendant anxiety – had up to this point killed in me.

My journal is pretty simplistic, but that’s because I’m trying to maximize the space so that I have room to write down my tasks. I write in something like 4-pt lettering and I will fill each of those day boxes completely full with tasks. So I don’t have room for full- or half-page illustrations or motivational quotes at this point and I’m fine with that. Other people do, and that’s just fine, too.

It’s All About Dat Art


So, on to the second point as to why I am a bullet journal convert: doctors and colleagues have been telling me, for years, some variant of “you need to write stuff down”. Which I’ve tried to do, but I would always misplace the list, or forget to look at it, and it was just a bunch of scribbles anyway, so it was not useful. How is a bullet journal different?

Four-week spread.  This makes sense to me, as I currently
live my life week-to-week.  The color change is related
to the change in the Kemetic Orthodox liturgical calendar,
going from the season of Peret (growing) to Shomu (heat).
Part of it is that there is now a system for categorizing and marking the types of entries. Plus, you design it for yourself, for your own goals: instant buy-in! But the REAL difference for me is in the art. Art is that great thing that ties together all other disciplines as an expression. You want to get to the top of Bloom’s Taxonomy in a heartbeat? Art is how you do it. Art is what keeps you coming back – at least, it’s what keeps me coming back, wanting to scribble and tweak and decorate, and keeps me looking at the journal.  My coloring is really basic, but it also makes me less likely to lose it: after all, I’ve put a considerable amount of work into inking and coloring the thing.

In Conclusion


I cannot overstate the effect that designing and decorating using this journal, as ludicrously basic as it is, has had on my anxiety level. I feel like a whole new person.


* Staples, Office Max, Office Depot, whatever.

** And which probably explains my perverse love of demotivational posters.

*** I have a Bachelor’s Degree in Fine Arts and have not really truly used it – at least not for painting – in 20 years, as is probably obvious. Some of the art I’ve seen in Googling about bullet journals is absolutely gawwwjus

It Lives!

Whoa, it's been a hugely long time. This is just a holding post. I have thoughts percolating, and not a whole lot of mental energy to put together a blog post (for me, these are time-intensive things), but I want to keep this alive. I will probably have to refrain from providing Esperanto translations, also, as those take a lot of time to do. But we'll see how it goes.

Sunday, April 08, 2018

Churchy Thoughts

A little bit of background for this post: I am Kemetic Orthodox, but attend a Protestant Christian church with my husband, who is evangelical Christian. I don't feel any particular pull towards Christianity, but I appreciate church time as a dedicated time to (usually) think religious thoughts. For various reasons that will go unnamed at this point, I'm not particularly integrated with my actual faith or its community. I'm kind of stuck between: I appreciate my husband's community, but I'm not really a part of it.

At any rate, when I go to church, most of the time there's something in the sermon or music that gets me thinking. Today, the pastor was talking about the "born again" experience as creating an entirely new person, and he was basically talking about how the old person shouldn't be confused for the new.

I was thinking, "don't mistake the ka for the ba." In KO, a person has multiple souls. The ka is (in our thinking) the personality -- that spark that makes you you, as a person in this lifetime. The ba is that eternal part of you - that timeless soul. It's important not to mistake one for the other, or to think that because of something you've done in your lifetime, that you're stuck with that as who you are. It's part of who you are, and always be so, but doesn't define the eternal you.

I also got to thinking about the shuwyt, or "shadow". I've been thinking about Ma'at a lot, lately, and it occurred to me today that She is the spark at the core of creation: a light that shines throughout all of the universe. the shuwyt is kind of like a keel or sail: the keel and sail help to orient a boat in a fixed or variable (respectively) relationship with the motive force. A shadow always stretches away from the light an an opposite angle from the light source; I've begun to think of the shuwyt like a sail or keel, that shadow of the self-of-you that wants to be in alignment with Ma'at helping to swing you around in the right direction.

I thought a bit about Apep: I thought of Apep as a serpent that wraps its coils around you, blocking off your view of Ma'at, and weakening the shuwyt. It takes strength -- such as in the form of Set or Sekhmet or Heru -- to do battle with this force.

Some of the music lyrics talked about the perfectness of God. Often, I rewrite the lyrics with a Kemetic bent as I go, and sort of "sing along" in my mind. Today I was thinking about how perfect Netjer is, but Netjer as a totality of all the Names. Each individual Name isn't necessarily perfect: how could They be? They're finite aspects of the infinite Whole. But all taken together as one community, They are Netjer and are perfect. This is a model of an idea that we humans, too, can't approach perfection unless we do it together, as a community. We never will reach it, because we're finite, but we can't go it alone.

Which makes it highly ironic, or sad if you think of it that way, that I feel myself so isolated from my community. I'm kind of stuck.

Another thought that occurred to me was that as opposed to the born-again Christian idea of being born again as a completely new person, a more Kemetic thought might be that you're not necessarily made completely new, but that your perspective is widened. That person that you were before, that person whom you may not want to be before -- you needed to be that person then in order to be the person that you are, as "ridden" by God, today. It would be analogous to walking a narrow, rocky path in bare feet: it hurts. The path is hard to follow. You stumble along the way. But a widened perspective reveals that there are gaping chasms on either side: it might still hurt to walk that path in your bare feet, but your widened perspective helps you to understand why you need to walk that path.

So I don't think of religious commitment (at least, my own KO religious commitment) as necessarily being a new person with a new identity. What it is is you becoming more fully the person who answers to your ren (your name, but in this case it's the word that your Parent spoke to make you). The ren was there all along.

Sunday, November 06, 2016

Ramadan

[ In Esperanto ]

This post is admittedly horribly late. But it's been bouncing around in my skull for a while, so I thought I might get it out there.

In the interests of encouraging on of my co-workers, who is Muslim, I observed Ramadan with him. By "observed", I mean that I fasted during the day, and I knit some hats for refugees as a part of the charity aspect. No visits to the mosque or any other activities. But I came away with some impressions:

  1. Not having food sucks.
  2. When you don't have food, all you think about is food. It is tremendously difficult to be productive.
  3. I still cannot imagine what it would be like to not only go without food, but to do it without the certain knowledge that as soon as the sun goes down, you can eat. So, given that it's difficult to be productive when you do know you're going to eat, I can only surmise that it would be even more difficult to be productive if you didn't know when you'd be getting your next meal.
  4. Multiply this by 1000 when you're worrying about a family.

Lack of regular access to food is, therefore, a barrier to success -- both physically and mentally. It's a form of oppression. And if you have to spend all your time acquiring food and the materials to cook food, how could you have the time to teach your children anything else, or do something to dig yourself out of that metaphorical hole?

Observing the fast opened a tiny, tiny window into the world of hunger. For me, it's a tiny window because there are no barriers whatsoever to me or my beloved family eating whenever we want to. There is a much broader and more awful landscape to this issue. I don't think the solution is necessarily "throw money/food at people". I think it's important that everyone be self-sufficient. But there are small steps that can be taken:

  1. The search for and use of resources in order to prepare food in a healthy manner is a trial all of its own. I am very interested in the Integrated Cooking Method as a means to reduce the waste of time and material in order to heat up food and/or water to safe temperatures. In particular, devices like the Water Pasteurization Indicator (WaPI) are important for ensuring that water is Pasteurized (rendered free from biological contamination). This is critical not only in areas with inadequate water sanitation facilities, but for preparing for widespread disasters that affect the clean water supply.
  2. I love charities like Heifer International, because they offer not only stuff (in the form of live-/agricultural/aquacultural-stock), and not only the education needed for sustainable farming, but also require the pledge to pass on that knowledge and the first offspring to someone else in the community.

Food's important. You can't function without proper nutrition and hydration. You can't succeed without being able to function. You can't pull yourself out of a bad situation if you can't succeed. It's always more complex than this -- there are many, many, many barriers to success -- but food and water is pretty basic. Not eating or drinking during the daylight hours for a whole month was a simple, but powerful, reminder.

Tuesday, May 31, 2016

A Little Knitting Dictionary

In the group thread "Trikadovortoj esperante" at Ravelry, user "kvarko" posted a link to the PDF version of the second edition of the book "Kudra kaj Trika Terminaro" ("A Collection of Sewing and Knitting Terms", by M. and V. Verda. Using this, I made a little dictionary of knitting-related words. I added some words, which I've marked in orange. If you know of or want to propose other words, please comment!

[ Eo - En ]

English Esperanto
abbreviation mallongigo
alpaca alpako
ball (of yarn or thread) bulo
ball of yarn, yarn ball lanbulo
to ball (yarn) buligi
to bind off detriki
to block formigi
cable kablo
to cable kabli
cake of yarn, yarn cake lankuko
to cake (yarn) kukigi
cashmire kaŝmiro
to cast on surtriki
circular needles trikiloj cirklaj
cotton kotono
Double Knit (DK) worsted wool (weight of yarn) duobla lanfadeno
fabric ŝtofo
fingering weight fingrumopeza
garter stitch krurzona trikaĵo
gauge (stitch count) gaŭĝo
gauge (size of needle) kalibro
gauge tool (for determining needle size) kalibrilo
to graft (invisible stitch) grefti
k rek
kapok kapoko
knit rekta (rek)
knit together kuntriku rekte (kr)
knit two together (k2tog) kuntriku rekte 2 (kr2)
knitting needles trikiloj
ktog kt
k2tog kr2
lace punto
laceweight puntopeza
m (make/add a stitch) ald
m1r ald1a
m1fb ald1akm
m1l ald1m
make (add a stitch) aldonu (ald)
make one front and back aldonu unu antaŭe kaj malantaŭe (ald1akm)
make one left aldonu unu malantaŭen (ald1m)
make one right aldonu unu antaŭen (ald1a)
make one through right shoulder (of previous row's stitch) aldonu unu en dekstran ŝultron (ald1ds)
make one through left shoulder (of previous row's stitch) aldonu unu en maldekstran ŝultron (ald1ms)
materials bezonaĵoj
mohair mohajro
nylon nilono
p inv
pattern modelo
pattern specimena recepto
p2tog ki2
-ply -fadena
ptog kti
purl inversa (inv)
purl two together (p2tog) kuntriku inverse 2 (ki2)
purl together kuntriku inverse (ki)
ribbing, knit one purl one (k1p1) kolonoj, unumaŝaj
ribbing, knit two purl two (k2p2) kolonoj, dumaŝaj
ribbing, rib stitches kolonoj
round rondo
row linio
seed stitch sema trikaĵo
silk silko
skein fasko
skein of yarn lanfasko
skein of yarn lanringo
stitch (st) maŝo (mŝ)
sl gl
sl1wyif gl1kla
sl1wyib gl1klm
slip glitu
slip with yarn in front (slwyif) glitu kun lanfado antaŭe (glkla)
slip with yarn in back (slwyib) glitu kun lanfado malantaŭe (glklm)
stitch (st) maŝo (mŝ)
stockinette stitch ŝtrumpeta trikaĵo

to thread
tredi
Triple Knit (Aran) worsted wool triobla lanfadeno
wool lano
worsted wool, yarn lanfadeno
yarn over ĉirkaŭturnu (ct)
yarn over twice ĉirkaŭturnu 2 (ct2)
yo ĉt
yo2 ĉt2


Also, please feel free to take this list of words and translate them to your own national (if you're not an Esperanto speaker from birth) language!

Sunday, May 29, 2016

Mystery Knit-a-Long

[ In Esperanto ]

For those of you active in the knitting world, you probably know all about the Mystery Knit-a-Long.  It's the companion to the standard knit-a-long, which is a project or pattern shared online that people in different locations knit over a shared span of time, sharing their progress with one another as they go.  There are online fabric arts stores (such as Jimmy Beans Wool) that cater to this, setting up project kits for sale that are usually linked to some master project page, often at Ravelry (an online fabric arts community).

The Mystery Knit-a-Long is a special breed of KAL (of course there is an acronym) in which the pattern is released in parts ("clues") over a period of time.

Lots and lots of spoilers
I just completed my first KAL, which happened to be an MKAL, yesterday.  It's called "Queen of Thorns" and is a Game of Thrones-themed MKAL paying homage to that prickly old lady, Olenna Tyrell of the House of Highgarden.

Being a big Game of Thrones fan, that's what caught my attention (sucker!), so I ponied up the $42 bucks for the yarn set, bought the $3.50 pattern introduction, and jumped right in.

As mentioned before, I'm an intermediate knitter (but a beginner when it comes to lace), so parts of the project were challenging to me.  But it was lots of fun nonetheless, and also frustrating when I'd make mistakes and have to rip back to a known spot to start over.  Knitting this sort of thing is a duel-edged sword: it's really good for my mental health in that I don't dare concentrate on anything else while I'm doing it or I'll mess up (keeps me from thinking about work) but is really bad for being around the family because they want attention and I can't provide it if I'm knitting.  So I have to learn to balance.

Anyway, I've learned some things from the MKAL that I think are worth mentioning, both from the perspective of a participant and as advice to a designer from a newbie's point of view:


  • QoT Color Block
    Picking colors is challenging, because the whole point of the MKAL is to be an M - that is, you don't know exactly what you are doing or how it's going to turn out.  For this project, I went with the designer's choice.  I think in retrospect that had I known what the final pattern was going to be, I would have adjusted colors (in particular, I would have picked a pale grey or white color for the "rosebuds" section of the shawl).  For the designer, I'd recommend putting a color block into the pattern.  This allows the prospective knitter to get a rough sense of the color progression & proportion, without giving away the actual pattern, and will help those of us who want to a) choose another of your suggested color sets or b) go entirely off the rails and do our own thing.
  • You need blocking wires for lace.  Blocking is a process in which you soak your project and dry it until it's lightly wet or damp, then pin or wire it into the final intended shape; when it's dry, it holds that shape.  Or is supposed to: I'm still, as of this writing, struggling with the picot edging and making it thorny like I see the other (much more skilled) participants doing.  Having wires, especially flexible wires, would be helpful, especially for that (or any lacy) edging and I'd like to see that as a suggested item.
  • Non-standard instructions make the pattern fun.  There were actually parts of the pattern that were (sorry, Marinade) a little boring -- there was a whole section of garter stitch, for example.  It got interesting when the designer included instructions for something she termed "Make Cluster", which was unusual and new and interesting.  But it was particularly challenging because the instructions were all written -- it became clear, fairly quickly, that a lot of the participants were having problems with this, so a number of descriptions were posted, but not all of them were actually what the designer intended, so she ended up making a video of the technique herself.  I had actually watched one of those other people's videos, so my rosebuds aren't what she intended, but I was too far along in the process by the time I realized this, so I just kept doing what I was doing (and it turned out all right).  Two lessons learned from this:
    • For me: read, and follow, the "knitting help" forum thread for the clue, before actually starting.  Even if I think I know what I'm doing.
    • For the designer: pictures, pictures, pictures.  Any time you do something non-standard (i.e., not a stitch that's available on any of the standard knitting help sites, such as Lion's Brand Yarn), show pictures.  It's not too hard to manipulate a photo so that it will print nicely, and I will help any MKAL designer with that stuff -- though you have to be patient with me, because I am busy "IRL" and it cuts down on my free time.  But if you don't have a photo-editor of your own or aren't that conversant in it, hit me up.


Block me!
So, with all that said, I highly encourage you to get involved in one of these.  It can be pricey, but it is fun, and always interesting when you're waiting around for that next clue, and you get something nice that you've hand-made at the end of it.  How cool is that?

Sunday, April 17, 2016

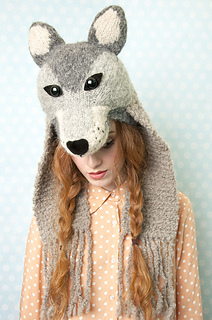
Wolf Headdress - Finished!

The Headdress
[In Esperanto]

Well, it's done.   I'm going to increase my estimation of its difficulty to "intermediate - challenging" or perhaps "expert" based on how hard it was to piece together.

Then again, it could simply have been because I just really, really, really wanted to get it done and didn't take the time to be very careful when doing the final construction.

One ear is pretty mangled - that's the one I burned.  I think I put it on with a slight twist; also, I don't think that I filled them enough.  Recommendation on the ears: fill them very full.

Eyes: I went with sew-in plastic eyes.  If I could do it again, I'd make the eyes entirely out of felt.  It'd safer for smaller children, and these eyes came out of the wolf's head three times after I'd sewn everything up.  I ended up sewing them directly to the white felt backing, which isn't as secure as I'd have liked.  If they come out again, I'm going to rip them out and embroider on fully felt eyes.

One other thing I did differently: the plaits.  Instead of braiding three 12" strands and then sewing them into the bottom of the falls, I ran two 24" strands through the bottom of the falls and then did a four-strand braid (link to T.J. Potter's site, which is how I learned how to do it).  It takes more yarn, but I had a lot left over (the falls only took one skein of boucle).

The hardest part was the fact that the head is not a standard stuffed animal head.  No, it's sitting on a hat, which is convex inside the wolf's head.  I didn't have a form with which to work; instead, I put it on the impatient girl-child and worked as quickly as I could.  Recommendation: have a head form to which you can pin this thing when you're doing the final stuffing and construction.  I didn't use pins to hold it together -- I tried, but because it was a floppy bunch of cloth, the pins didn't work very well.  With a head form, I could have pinned it without too much trouble.

So, I'm thinking that I would like to do another one of these -- a Yinepu (Anubis) head out of black yarn, with Hawai'ian eyelash lei yarn for the insides of the ears (so they're fuzzy), or a Set head out of shades of red.  But I won't contemplate it without a head form!

Monday, April 11, 2016

Louise Walker's Wolf Headdress

Louise Walker's Wolf Headdress
link: Ravelry page
[ In Esperanto ]

At the request of the Next Generation, I've been working on this project from Louise Walker's book, Faux Taxidermy Knits.

Assumptions
You've got the book in hand.

BLUF (Bottom Line Up Front)
The work is rated "intermediate", and I think that between the Fair Isle multi-color knitting and the final construction, that's about right.

Typos
The book contains some typos, or what I think are probably typos:
  1. Materials list: calls for a set of US 11 (8mm) straight needles.  In the "Boucle Falls" section, the instructions call for you to knit using US 10 (7mm) needles.  I did it with the US 10 needles and that's what I'd recommend.
  2. "Top Wolf Piece", row 56: it should be "p20b, k5b, p24a, k5b, p20b."
  3. "Boucle Falls": after you've obtained 6.5 inches of knitting, you're instructed to knit 22 stitches and put the remaining 23 on a stitch holder.  This is the new row 1, but then you're given instructions for rows 2, 4, and 5.  There is no row 3.  I recommend that you simply knit all stitches for row 3.
  4. Then, in the next section of "Boucle Falls", it tells you to knit the other section, referencing rows 1 through 4.  Then it tells you to repeat rows 4 and 5.  Repeat rows 3 and 4 instead.  Knit until the entire piece measures 16" (not 8" as instructed) -- in essence, so that the second fall is the same length as the first.
  5. "Front Ears", row 4: it should be "p7a, p4c, p7a".
Hat Base / Bottom of Snout
In the "hat base" section, round 4 tells you to "place 20 sts onto scrap yarn, k1, p1 across the remaining 6 sts."  Then on the next row, you're supposed to "[knit] over the scrap yarn."  This part confused me greatly.  I think that it would be a lot easier if you did it like this.

First, don't place 20 stitches onto scrap yarn.  Knit 20 stitches using the scrap yarn and make sure it's a contrasting color and texture.  Leave a long tail and don't tie it.  On the next row, k1, p1 using the original yarn all the way through.  Finish the hat base pattern.
Knitting using scrap yarn

Knitting over the scrap yarn
Now for the "Bottom of Snout" part, what you're going to do is pick up the stitches on either side of the scrap yarn.  Louise recommends using US 6 needles to do this, because it's easier, and I'd recommend it too.  You'll end up with 20 stitches on either needle, and they'll be slightly offset: if you've got the top of the hat facing away from you, the top needle will have the left-hand-most stitch (look at the picture on page 46 to see what I'm talking about).
Stiches picked up
So now you can pull out the scrap yarn and you'll have a big hole in the hat as per the picture on page 46. 

The gap
Turn the piece around so that the top of it is facing you and follow the instructions (put the right-hand-most stitch that's on what is now the bottom needle onto the top needle and then purl it and the next stitch on the top needle together).  You'll end up with this:

Gap purled together
And you can continue with the rest of the pattern as indicated.

Lessons Learned
The biggest issue for me (as a high-level beginner) besides the hat base/bottom-of-snout situation was the Fair Isle knitting.  I used the yarns for which the pattern called, which were Rowen yarns - mostly an Alpaca cotton mix, but also a Boucle yarn that was British sheep wool.  Side note: the Alpaca yarn is amazing.  Soooooo soft.  I don't usually work with high-end yarns like this.  It was expensive, but worth it.

At any rate, the yarn likes to cling to itself.  So the primary thing I learned was that when it came time to twist the yarns behind the work, that I needed to stretch out the work flat on the working needle and make sure I twisted very loosely.  The first piece I made was the hat/underjaw, and because I didn't twist loosely, the jaw ended up being puckered.  I was able to smooth it out with blocking, as I did with the ear that ended up being smaller than the other ear (but be careful with that iron: I ended up burning the one ear a little).

I haven't made up the final headdress, including the stuffing, yet.  I'll finish up this adventure with another blog post, provided that it turns out to be educational, which I am absolutely sure it will, because I've only ever knitted one other stuffed item (a bear) and it was terrible. Onward!